Rexarc is currently open from 7:30 AM – 4:00 PM EST, Monday – Friday. Read More
Rexarc is currently open from 7:30 AM – 4:00 PM EST, Monday – Friday. Read More


Acetylene, being one of the widely used compressed gases, is nowadays produced on a larger scale using acetylene plants. As with any regular compressed gas generation equipment, these plants are fitted with several parts that play a key role in their functioning. These parts require regular maintenance and cleaning to ensure their long-term performance. The generator is one of the key parts of the acetylene production equipment that requires regular cleaning. The cleaning intervals will depend upon the amount of acetylene produced by the generator, as well as the quality of the carbide received. Experts at Rexarc, a leading manufacturer of acetylene plants, components, and acetylene generator, suggest that this cleaning must be carried out at least once in a year. Also, it can be conducted when the production reaches 2 million cubic feet. This cleaning needs to be conducted in a special way. This post gives away special tips for cleaning acetylene gas generator machines.
Steps for Cleaning Acetylene Gas Generator in Your Facility
What is the right time to clean the generator? This is one of the most obvious questions that experts at Rexarc have to answer, when their clients approach them with cleaning doubts. They always say that the generator must be cleaned when the paddles of agitator start touching the ferro silicates at the bottom of the tank. As, this contact inflicts excessive wear and tear on the paddles, or may even break them, thereby affecting the functioning of an agitator. Here’s how users can go about the cleaning procedure:
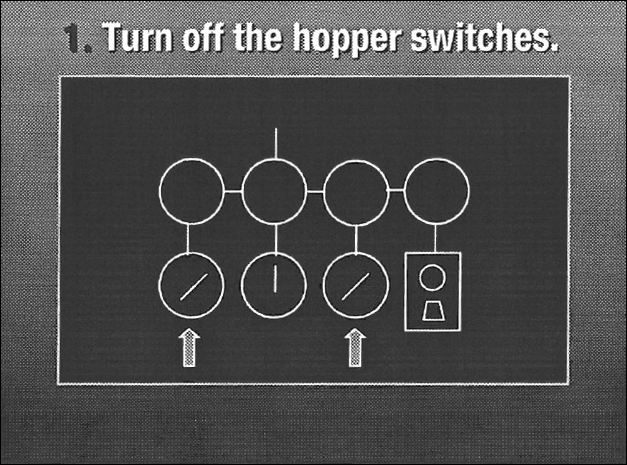
1. Empty the Carbide Hopper before Cleaning the Generator: As a first step, the carbide hopper must be emptied before starting with the cleaning procedure. Once the carbide is exhausted from the hoppers, locate the switches on the hopper, and turn them to off position. Some generators utilize 1,200 and 5,000 pound capacity carbide hoppers. If it is not possible to empty carbide from these hoppers, then remove the inspection plates of hydraulic feed valves. Next, check the seat of the feed valve to ensure positive closing during the cleaning operations.
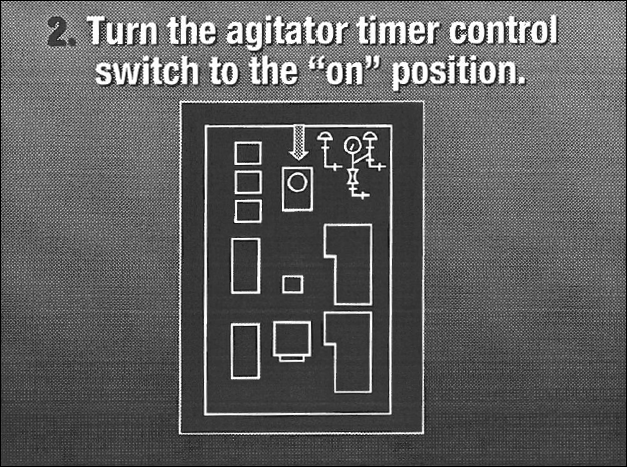
2. Turn on the Agitator: In the motor control panel, locate the agitator timer control box, and put it in the ON position. This will help prevent the entry of the carbide into the generator, as well as allow the agitator to run continuously.
3. Ensure the Air System Inlet Valve is Kept Open: Located the air system inlet valve, and ensure that it is kept open.

4. Close the Flashback Arrestor Inlet and Outlet Valves: Next, close the inlet and outlet valves on the flashback arrestor. This will help you withdraw the generator from service. Also, turn off the hopper toggle switches.
5. Close the Charging Manifold Drainback Valves: Now, proceed to the charging manifold locate the drainback valves and close them.
6. Close the Drainback Manifold Outlet Valves: Check on the outlet valve on the drainback manifold, and slowly close it. Now, the generator will be completely isolated, so you can dilute the lime water and drain the generator tank.
7. Record the Meter Reading: In the next step, note down the water meter reading.
8. Open the Generator Inlet Water Supply Valve: Now, open the inlet water supply valve of the generator, and turn the water temperature instrument control knob to the left, until it stops moving. This will allow the water to enter the generator.
9. Open Generator Relief Valves: Move handles to the vent position to open the generator relief valves. This will help vent pressure from the tank.
10. Insert a Pin into the Residue Drain Pilot Valve: Once the relief valves are opened, next insert a pin of size 1/4ʺx 3ʺ into the residue drain pilot valve. This will help keep the drain valve open. Add approximately 1,100 to 1,200 gallons of water, and monitor the water reading to ensure the same.
11. Check the Temperature on the Water Temperature Control Instrument: Continue filling the generator tank with running water until the temperature is reduced to 90°F. This temperature change can be noticed on the control instrument used for controlling the water temperature. If the temperature is above 90°F, then continue adding water until the temperature drops down.
12. Turn the Temperature Inlet Control Knob to the Original Position: Once the temperature drops below 90°F, turn the water temperature instrument control knob to its original position. This will stop the water from entering in the generator. Open low limit test valve and watch low level alarm gauge. Replace or clean control units if water is below low limit test valve before the low limit alarm gauge drops to 7 PSIG. Turn off alarm bell after this test. During the test, ensure that nitrogen pressure is maintained at 6 PSIG, as it will help in maintaining the tank pressure while draining the tank.
Once the tank is empty, check for the presence of acetylene. If acetylene traces are found, then repeat steps 10 to 12. Repeat this procedure until no acetylene is found inside the tank when emptied.
13. Turn Off Power Supply to Agitator: Once the tank is empty, turn off electrical power to drive motor of the agitator. Next, reset timer control of the agitator. Tag or lock out all generator energy systems as per the OSHA tagout/logout procedures.
14. Purge Generator Tank and Carbide Hoppers with Nitrogen: This can be conducted in the following ways:
After purging, ensure that safety valves of the tank and hopper are in the open position. Check the tank interior using explosion meter. Insert the probes through the water to test valves. If reading shows an explosive atmosphere then continue purging tank with nitrogen until non-explosive reading is shown on the meter. Always ensure that the purging is conducted in sufficient ventilation, as this helps prevent nitrogen accumulation in the air, which may lead to asphyxiation.
15. Remove the Manhole Cover and the Screwfeed Cover Plates: After purging, remove the manhole cover plates and the screwfeed cover plates of the generator. Clean the tank interior using water hose in high velocity. Use a wooden paddle to scrap out heavy particles that are settled at the bottom of the manhole.
Caution: Avoid using a metal scraper or metal tool for scraping, as this may lead to a spark. Also, use only explosion-proof extension light or flashlight to check inside the tank.
16. Perform Inspection of Various Parts: After the above steps, you can launch a detailed inspection of other parts such as agitator shaft, agitator paddles for wear and tear, paddle mounting bolts for tightness, and so on. Next, remove build-up from water spray nozzles, or the opening of equalizer pipe elbow positioned below or ends of screwfeed tubes.
17. Remove Various Parts: Remove plug at tee from a pipe located at tank center riser. Clean the pipe towards flashback arrestors with water. Remove plug located at the center of each flashback arrester, and clean the flashback arrester with water. Remove off-center plug located at the bottom of each flashback arrester to drain water from arresters. Flush again with water and replace all the plugs. Ensure to snug all bolts when replacing manhole covers. Next, snug all bolts, and then tighten them across in the sequence rather than going in bolt circle.
18. Ensure the Parts Are Functioning Properly: Refill flashback arresters and generator with water. Next, purge the generator with air-acetylene mixture and nitrogen before returning to service. Check high and low-level alarms, and if controls have been changed. Check all lubrication points, as well as lubricant levels in gear reducer.
19. Conduct Leak Testing: You can leak test hopper fill plug gaskets, hopper vent valves, and safety relief valves with soap and water. Replace the leaking plugs immediately to avoid any complications in the future.
When all these procedures are followed with safety precautions, they will ensure a proper and safe acetylene generator cleaning. Do you still have doubts? Get in touch with experts at Rexarc. With a vast industry experience to their credit, the experts are always ready to help you.

We are a one stop shop from custom vessel production to full skidding, plumbing and instrumentation.

We stand by our processes and communicate with you on your project status as much or as little as you would like.

We continually reinvest in our people, business, and equipment technology to ship quality products on time.